Author: Anil

  • The Ultimate Guide to Create Your First Offer

    In 1916, Clarence Saunders revolutionized retail with the world’s first self-service grocery store, Piggly Wiggly. Before this, customers handed shopping lists to clerks who retrieved items from shelves. Saunders noticed the inefficiencies: long waits, mistakes, and wasted effort. His innovation? Let customers pick their own items, saving time and reducing errors. The concept was so successful that it became the model for modern supermarkets.

    Creating your first offer follows a similar principle. You identify a problem, design a solution, and present it in a way that resonates with people. Whether you’re launching a business, service, or product, this guide will walk you through the process step by step.


    Step 1: Understand the Problem

    The best offers solve specific problems.

    Saunders saw grocery shopping as inconvenient and slow. He uncovered pain points like inefficiency, higher costs, and long lines.

    Your Action Step:

    • Write down three problems your audience faces.
    • Dig deeper: Why do these problems exist? What emotions do they evoke? Frustration, overwhelm, confusion?
    • Use simple, clear language. Avoid jargon.

    Example:

    Audience: Small business owners
    Problem: Managing customer inquiries is overwhelming and time-consuming.
    Insights: Business owners feel frustrated by scattered communication channels and delayed responses.


    Step 2: Define the Transformation

    Your offer isn’t just a product or service. It’s a bridge from frustration to relief. This transformation is what people buy.

    For Piggly Wiggly, the transformation was clear: customers went from waiting in line to browsing freely.

    The result? Faster, easier shopping.

    Your Action Step:

    Complete this sentence:

    “After using my offer, my customers will go from [problem] to [solution].”

    Example:

    • Before: Business owners struggle to manage customer inquiries.
    • After: They efficiently handle all communications in one place, saving hours each week.

    Step 3: Craft a Simple Solution

    Keep it straightforward. A good offer effectively solves one core problem.

    When Saunders opened Piggly Wiggly, he didn’t try to solve every retail challenge. He focused on making grocery shopping self-service.

    Your Action Step:

    Design your solution:

    • Ask: What is the simplest way to address the problem?
    • Choose a format: Is it a physical product, a digital tool, a service, or a combination?
    • Focus on one thing: Avoid overwhelming customers with too many features.

    Example:

    Solution: A SaaS tool that centralizes customer inquiries into a single dashboard.. Format: A cloud-based software platform with a mobile app.


    Step 4: Craft Your Offer

    Your offer includes the main product or service plus any extras that add value.

    For example, Piggly Wiggly provided not only a self-service model but also spacious walkways and detailed signage to enhance the shopping experience.

    Your Action Step:

    • Core Offer: What is the primary solution?
    • Extras: What additional benefits can you include? Think templates, bonuses, or community access.
    • Presentation: How will you deliver it? Clearly explain how it works.

    Example:

    • Core Offer: A SaaS dashboard for customer communication.
    • Extras: Onboarding tutorials, integration with popular messaging apps, and a guide to optimize response times.
    • Delivery: Access via a secure login on the web and mobile apps.

    Step 5: Test Your MVO

    Start with a Minimum Viable Offer (MVO), a simplified version of your product that allows you to gather feedback and refine it before scaling.

    Your Action Step:

    • Share your offer with a small group (friends, colleagues, or beta testers).
    • Collect feedback on usability, clarity, and value.
    • Refine based on what you learn.

    Example:

    Offer your SaaS tool to 10 small business owners. Ask:

    • Was the dashboard intuitive?
    • Did it reduce the time spent managing inquiries?
    • What would they improve?

    Step 6: Price Your Offer Confidently

    Price reflects value. Many first-time creators undervalue their work, fearing rejection. But if your offer solves a real problem, it deserves a fair price.

    Pricing Tips:

    • Anchor to results: What is the transformation worth to your customer? A stress-free dinner might save hours each week.
    • Start simple: Choose a round number that’s easy to understand (e.g., $29, $49).
    • Test and adjust: Launch with a price and refine based on feedback.

    Example:

    SaaS Tool Price: $49 per month.

    Position it as: “Less than $2 a day to streamline customer communication and reclaim your time.”


    Step 7: Market Your Offer

    Your offer needs visibility. Even the best ideas fail without effective marketing. Saunders used signage and word of mouth to attract customers to Piggly Wiggly.

    Your Action Step:

    1. Craft Your Message:
      • Headline: Address the problem.
      • Subheadline: Highlight the transformation.
      • Call-to-Action: Tell them exactly what to do next.
      • Example:
        • Headline: “Simplify Your Customer Communication Today!”
        • Subheadline: “Centralized messaging for faster responses and happier clients.”
        • CTA: “Try it free for 14 days!”
    2. Share on Relevant Platforms:
      • Social media (LinkedIn, Instagram, Facebook).
      • Newsletters.
      • Collaborations with influencers in your niche.
    3. Use Testimonials: Highlight feedback from beta testers to build trust.

    Real-Life Example: Meal Plan Business

    Let’s bring it all together with an example:

    • Problem: Small business owners struggle to manage customer inquiries.
    • Transformation: Go from overwhelmed to organized with a streamlined communication platform.
    • Solution: A SaaS tool that centralizes customer messages into a single dashboard.
    • Offer Package: Core product, onboarding guides, integrations, and a response time optimization checklist.
    • Price: $49/month.
    • Marketing Message:
      • “Say goodbye to scattered messages and delayed replies.”
      • “Get started today with a 14-day free trial.”

    Your first offer doesn’t need to be perfect. Focus on solving a real problem with a simple, clear solution. Start small, test early, and refine as you grow.

    Think about Clarence Saunders. His first Piggly Wiggly store redefined retail, but it began as a simple idea to save customers time. Your offer could be the start of something just as impactful.

  • The Ultimate Guide to Comment on LinkedIn to Build Engagement and Influence

    In ancient Rome, Cicero was renowned for his ability to engage audiences with his speeches. He tailored his arguments to the interests and concerns of his listeners. He studied his audience, adapted their tone, and delivered comments that resonated deeply. His strategic engagement made him one of Rome’s greatest orators.

    Just as Cicero carefully strategized his speeches to capture the attention of his audience, you can build a LinkedIn engagement strategy that connects meaningfully with your network. Let’s explore actionable steps to help you engage effectively and grow your presence.

    Use this commenting strategy to grow followers:

    Let’s divide the commenting strategy into two segments.

    • Where to comment?
    • How to comment?

    Where to comment?

    You can create a list of –

    • Top creators (in your niche)
    • Most active creators (in your niche)
    • Creators who are just a step ahead of you.

    (You can create as many lists as you can.)

    Pro Tip: Create your lists in Notion.

    Your list could look like this.

    LinkedIn Engagement List

    Add as many properties as you like.

    For this example, we will use two categories as our engagement lists.

    • Expert Category
    • Peer Category

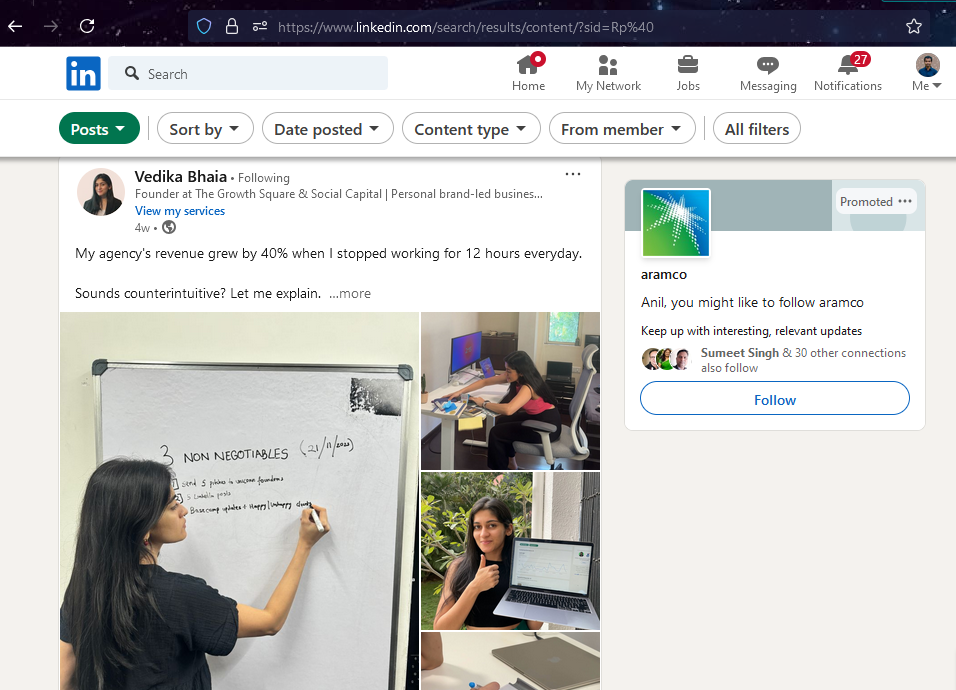
    Now, go to https://www.linkedin.com/search/results/content.

    You’ll land on a page like this:

    LinkedIn Search Result

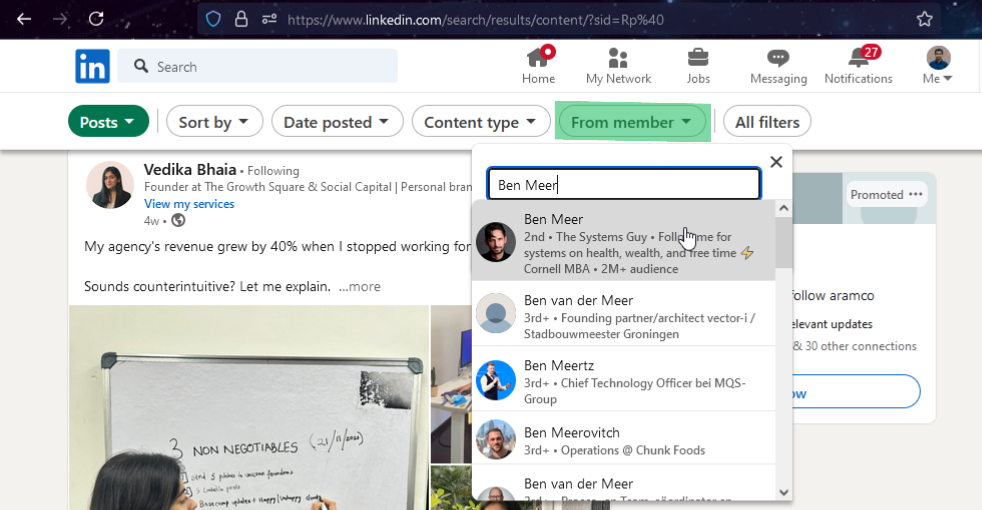
    Then click on ‘From member’ and add a creator from your list by clicking on their name like this:

    Then, keep adding as many profiles are there in your Notion list.

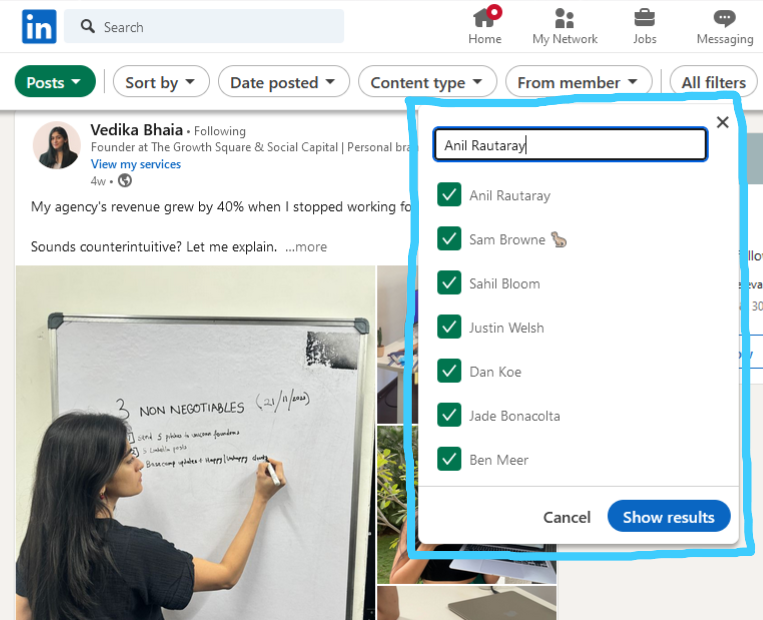
    Let’s assume we only added this number of profiles to our list.

    LinkedIn Search Result 3

    Click on show results.

    LinkedIn Search Result 4

    Now sort by latest and Date posted – Past 24 hours.

    Your list is ready.

    Copy and paste that URL in a safe place.

    Next time you click on that URL, you’ll see a curated feed.

    Important: The URL will change if you change anything, such as adding/removing a new member to that list.

    Create as many lists as you want to make like this, and your curated feeds are ready.

    Now, the second part —

    How to comment?

    For any post you can write 10 types of comments.

    You can:

    • Provide additional information related to the topic to add value.
    • Agree with the author’s point of view.
    • Challenge the thought of the post respectfully.
    • Ask a relevant and thought-provoking question.
    • Share a relevant quote with added insight.
    • Create a brief listicle to educate or entertain.
    • Share something you wish you had known earlier.
    • Share something normally reserved for paid clients.
    • Summarize the main points of the post in bullet format.
    • Write a humorous comment [Don’t be rude or offensive].

    Here is a post by Matt Barker:

    Example LinkedIn Post
    Here is the original post.

    Let’s write different types of comments for this post.

    1. Writing on social media also sharpens your ability to articulate complex ideas in simple ways—a critical skill in any field. The feedback loop from readers can spark continuous improvement too!
    2. Completely agree with these points! Writing on social is transformative—it’s like a mirror for your thoughts and a bridge to connect with others. Confidence definitely grows with consistency.
    3. Great points! I wonder if there’s a balance to strike between writing for confidence and writing authentically.

      How do you recommend staying true to your voice while aiming for personal growth?
    4. Love these benefits! Which of these 13 has had the biggest impact on your confidence? And do you think writing offline offers similar advantages?
    5. ‘The pen is mightier than the sword’—and in this case, mightier than self-doubt too!
    6. Totally agree!

      1️⃣ Write daily, even if it’s short.
      2️⃣ Focus on progress, not perfection.
      3️⃣ Engage with readers—they’ll teach you as much as you share!
    7. I wish I knew sooner that writing isn’t just about sharing knowledge—it’s a way to process thoughts and grow emotionally. The personal rewards are just as big as the professional ones.
    8. Why write on social?

      – Improves your skills
      – Builds confidence & creativity
      – Connects you with like-minded people
      – Inspires others

      Plus, it reminds you: Your voice matters. That’s powerful.
    9. Writing on social is the best confidence hack…unless your first draft includes too many emojis 🙃. But hey, even then, it’s a learning curve!

    An engagement strategy is your key to standing out on LinkedIn. By understanding your audience, curating thoughtful interactions, and providing consistent value, you’ll build meaningful connections and grow your influence.

    Start implementing your strategy today—your audience is waiting to hear from you!

  • 7 Proven Writing Frameworks to Turn Your Ideas into Content That Converts

    Every creator faces the same challenge: turning ideas into content that drives action. Writing isn’t just about expression—it’s about connection. To truly convert readers into followers, clients, or fans, you need frameworks that guide your message and make it irresistible.

    Here are seven proven frameworks to help you write content that not only resonates but also delivers results.

    1. PAS Model

    Problem: Describe your audience’s pain points

    Agitate: Worsen the problem

    Solution: Explain how you can help

    2. AIDA Model

    Attention: Hook your audience

    Interest: Point them towards a solution

    Desire: Persuade them that they want the solution

    Action: Tell them what they should do

    3. FAB Model

    Features: Explain what the product/service is

    Advantages: Say why it’s different from others

    Benefits: Clarify what users can get from it

    4. BAB Model

    Before: Explain a problem

    After: Sell a dream

    Bridge: Offer a way to get there

    5. STAR Model

      Situation: Define a problem

      Task: Describe the task or challenge involved

      Action: Explain how you managed the issue

      Result: Share the results of the action

      6. QUEST Model

      Qualify: Pinpoint your target audience

      Understand: Empathize with them

      Educate: Show the significance of your offer

      Stimulate: Make them want the offer

      Transition: Drop your Call-to-action

      7. PPPP Model

        Picture: Sell a picture that resonates

        Promise: Explain how your offer can help

        Prove: Back up your promises with testimonials

        Push: Push the readers towards a CTA

        Great content doesn’t happen by chance—it’s built on structure and purpose. These seven frameworks are your tools to craft messages that engage, persuade, and convert.

        Start experimenting with them today and watch your words work wonders!

      1. 5 Simple Habits to Write Better and Share Your Message Effectively

        Isaac Newton, one of the most brilliant minds in history, wasn’t just a thinker—he was a prolific writer. Throughout his life, he filled thousands of pages with ideas, observations, and theories. Newton’s habit of consistent writing reminds us that great ideas only gain value when they are expressed clearly and shared effectively.

        Like Newton, turning your thoughts into clear, impactful words is key to reaching your audience. Let’s dive into five simple habits to help you write better and share your ideas effectively.

        Here are 5 simple habits to write better.

        1. Build a System for Writing

        Building the right systems makes great writing unavoidable.

        • Write daily
        • Block internet
        • Read high-quality resources
        • Capture ideas and inspiration

        2. Write for a Specific Audience

        Follow the 1-1-1 rule

        • 1 post
        • 1 topic
        • 1 key message

        For example:

        Post – How sleeping for 7~8 hours is vital for creativity.
        Topic – Sleeping
        Key Message – Beneficial for creativity

        3. Writing vs Editing

        Writing and Editing are completely different processes.

        WRITINGEDITING
        ➝ Write, write and keep on writing.➝ Ruthlessly delete unnecessary stuffs.
        ➝ Don’t judge your writing.➝ Get straight to the point.
        ➝ Don’t edit just yet.➝ No fluff.

        4. Be Clear, not Clever

        Clever words lead to confusion.

        Use simple words.

        For example, a graphic designer who creates graphics for e-commerce websites could use the below lines for his/her service.

        Clever: “Pixel Perfect: Elevating Your Online Store’s Aesthetic!”

        Clear: “Beautiful Product Images for Your Online Shop!”

        5. Write a Lot

        That’s the advice.

        Writing thrives on clarity, consistency, and focus. Adopt these habits to improve your writing and connect deeply with your audience. Start today—your words can inspire and transform!

      2. How to Consistently Generate Unlimited Content Ideas Using a Simple Framework

        In the late 19th century, Thomas Edison emerged as one of history’s greatest inventors, revolutionizing innovation through structure and system. At his Menlo Park laboratory, established in 1876, Edison created what is often regarded as the first modern research and development facility. This “idea factory” allowed him and his team to systematically explore ideas, categorize them into projects, and prioritize the most promising inventions.

        Edison’s success wasn’t based on waiting for inspiration—it was rooted in creating a framework that encouraged continuous innovation. His process reminds us that with the right structure, we can consistently turn ideas into impactful creations.

        Just as Edison’s organized approach helped him and his team churn out innovative ideas, having clear content pillars and a structured process can help you consistently generate content ideas for your personal brand. Let’s explore the steps to set this foundation and unlock your creativity.

        We first need to have our content pillars sorted to generate content ideas.

        What are Content Pillars?

        Content pillars are broad topics tied to your niche to help you categorise your ideas.

        For example:

        Content pillars for a life coach could be: Self-improvement, mindfulness, work-life balance etc.

        Content pillars for a financial advisor could be: Investment strategies, tax saving, budgeting etc.

        Step 1 – Create a Content Calendar

        For example:

        Monday → Core topic (MOFU)

        Tuesday → Broad topic related to your industry

        Wednesday → Core topic  — Actionable (BOFU)

        Thursday → Core topic (MOFU)

        Friday → Your stories/opinions (TOFU)

        You can swap things up according to how you want.

        Step 2 – Follow an approach

        • How to
        • Lesson learnt
        • Mistakes
        • Quotes
        • Tools
        • Ways
        • Trends
        • Stats
        • Reasons
        • Examples
        • Moments

        Learn to say one thing in 100 different ways.

        Hit your ICP with different angles.


        If you’re still struggling to get content ideas, here are 30 ways to write on a single topic. This idea was initially shared by Samanee Mahbub.

        Let’s say the topic you want to write is [lead generation]

        Here are 30 ways to write on that topic.

        1. Tips: 5 tips to generate quality leads with minimal effort
        2. Skills: 7 skills you need to have to generate leads
        3. Tools: 10 tools to make your lead generation a piece of cake
        4. Traits: 5 must-have traits for any lead generator
        5. Steps: 3-step formula to generate lead flow from your profile
        6. Goals: 5 ways your lead generation system will contribute to your brand goals
        7. Books: 7 books to read on lead generation
        8. Habits: 9 habits one needs to develop to generate overflowing leads
        9. Quotes: 5 quotes on lead generation that will change your perception
        10. Secrets: 5 hidden secrets to make your lead generation activity a piece of cake
        11. Podcasts: 3 podcasts you need to listen to improve lead numbers
        12. Insights: 5 surprising insights from analyzing our last month’s lead generation efforts
        13. Benefits: 3 surprising benefits of lead generation
        14. Lessons: 5 lessons from our lead generation effort so far
        15. Reasons: 7 reasons why founders should invest more time in lead generation.
        16. Creators: 9 creators you must follow to ace your lead generation game
        17. Routine: My 3-step routine for generating consistently high-quality leads
        18. Mistakes: 5 lead generation mistakes you should never commit
        19. Examples: 3 examples of clear offers to generate quality leads
        20. Questions: 13 questions you should ask yourself (or the client) before starting lead generation
        21. Templates: 5 lead form templates to generate leads
        22. Framework: 5 persuasive frameworks to generate quality leads
        23. Challenges: 7 challenges you will face when trying to generate leads and how to avoid those
        24. Companies: 7 companies that ace lead generation
        25. Statistics: 5 statistics on lead generation that will blow your mind
        26. Technique: 3 persuasive techniques to close more leads
        27. Mindset shifts: 7 mindset shifts every new lead generator needs to adapt
        28. Principles: 5 lead generation principles every founder should know
        29. Courses: 3 must-take courses for every lead generator
        30. Exercises: 3 simple exercises you can do to improve your lead generation

        Remember, a brand without strategy is a car without wheels.

        Content creation thrives on structure and variety. By building your framework, tapping into diverse angles, and following a proven process, you can transform any topic into a steady stream of ideas. With the right strategy, your content won’t just inform—it will inspire.

        Start structuring your ideas today and watch your creativity flourish!

      3. The Ultimate Content Strategy for Your Personal Brand

        In the 18th century, Benjamin Franklin didn’t just revolutionize science and politics—he mastered the art of content creation. As the publisher of Poor Richard’s Almanack, Franklin understood his audience deeply. He combined practical advice, wit, and relatable anecdotes into a structured format that resonated with readers year after year. His content wasn’t random; it was carefully designed to educate, entertain, and build trust. Franklin’s almanack became a staple in households, cementing his legacy as a thought leader of his time.

        Franklin’s approach teaches us that content, when crafted with strategy and purpose, can transcend its medium to create lasting impact.

        Just like Franklin tailored his content to resonate with 18th-century readers, your personal brand needs a structured content strategy to engage and inspire your audience. Let’s dive into the actionable steps and frameworks to craft a strategy that leaves a mark.

        How to Create a Content Strategy

        Questions to ask yourself before creating a content strategy:

        About your journey:

        What sparked your current path? 
        What motivated you to change the course of life? 
        What was the biggest obstacle in making this shift? 
        What were your initial objectives? 
        When did you truly believe in achieving your goals?
        How has this journey transformed you?
        What significant challenge emerged once you started seeing progress?
        What doubts or setbacks challenged your commitment?
        What kept you motivated during challenges?
        What is your ultimate vision for your work? 


        About your expertise:

        What common beliefs in your field do you believe are misleading? 
        What under-discussed ideas hold great potential in your field? 
        How can you demonstrate your approach to achieving results? 


        About your achievements:

        What accomplishment brings you the most pride? 
        What unique evidence establishes you as a credible expert? 


        Choose your 2-3 core topics that you want to talk about and stand for.

        Once you’ve explored your journey, expertise, and achievements, it’s time to lay the foundation for your content strategy. A clear strategy ensures your message resonates with your audience and aligns with your brand goals.

        The 3 Layers of Content Marketing

        I learnt this strategy from Pierre Herubel.

        He shared this on LinkedIn.

        1. Content Strategy Layer

        Begin with a deep understanding of your audience’s problems and motivations. Uncover the why behind their buying decisions and the how of their journey to ensure your content aligns with their needs. Analyze their buying process to identify what information they require at each stage to move closer to making a purchase.

        • Target Audience — The specific people you want to reach with your content.

          Knowing your target audience helps you tailor your content to their needs, preferences, and pain points, making it more relevant and effective.
        • Positioning — How you differentiate your product or service from the competition in the minds of your target audience.

          Effective positioning ensures your audience understands the unique value your offering brings, setting you apart in the marketplace.
        • Messaging — The key messages you want to communicate to your audience.

          Clear and consistent messaging helps convey your value proposition, benefits, and what you stand for, ensuring your audience understands and remembers your brand.
        • Narrative — The overarching story that ties your content together.

          A compelling narrative engages your audience emotionally, making your content more memorable and persuasive.
        • Manifesto — A public declaration of your beliefs, goals, and values.

          A manifesto can inspire and rally your audience around your brand’s mission and vision, fostering loyalty and community.
        • Content Pillars — The main topics or themes around which your content is centred.

          Content pillars provide a framework for content creation, ensuring consistency and helping maintain focus on what matters most to your audience and brand.

        2. Content Plan Layer

        Once you know your audience, shift focus to planning content. Ask, “What do my audience need to see?” instead of “What should we create?”.

        Decide on the key ideas, platforms, formats, and types of content that would serve their needs.

        • Objectives — The specific goals you aim to achieve with your content.

          Clear objectives guide your content creation and measure success, ensuring your efforts align with overall business goals.
        • Budget — The financial resources allocated for content creation and distribution.

          A defined budget helps manage resources efficiently, ensuring you can produce high-quality content within your financial means.
        • Channels — The platforms where your content will be published and promoted (e.g., blog, social media, email).

          Choosing the right channels ensures your content reaches your target audience where they are most active and engaged.
        • Formats — The different types of content you will create (e.g., text posts, carousels, articles, videos, infographics).

          Diverse formats cater to various audience preferences and consumption habits, increasing engagement and reach.
        • Repurposing Plan — A strategy for reusing existing content in different formats or on other channels.

          Repurposing content maximizes the value of your content, extending its lifespan while saving time and resources.
        • Distribution — The process of sharing and promoting your content across chosen channels.

          Effective distribution ensures your content is seen by your target audience, driving traffic, engagement, and conversions.
        • Insights — Data and feedback gathered from your content performance.

          Insights help you understand what works and what doesn’t, informing future content strategies and improving effectiveness.
        • Timeline — The schedule for creating, publishing, and distributing content.

          A timeline ensures consistent content delivery, helps manage workloads, and aligns content production with marketing campaigns and business objectives.

        3. Content Creation Layer

        Crafting quality content requires both strategic insights and skilled execution. Work with talented copywriters, designers, and video editors, and value their expertise.

        • Research — Gathering information and data relevant to your content topics.

          In-depth research ensures your content is accurate, informative, and valuable, building credibility and trust with your audience.
        • Ideation — Generating ideas for content topics and themes.

          Creative and relevant ideas keep your content fresh and engaging, addressing your audience’s needs and interests.
        • Psychology — Understanding the psychological triggers and motivations of your audience.

          Leveraging psychological principles helps create content that resonates emotionally, persuades, and drives desired actions.
        • Styling — The visual and tonal elements that define your content’s look and feel.

          Consistent styling reinforces your brand identity, making your content recognizable and professional.
        • Frameworks — Structured approaches or templates for creating content.

          Frameworks ensure your content is well-organized, coherent, and aligns with best practices and goals.
        • Copywriting — Crafting written content that communicates your message effectively.

          Skilled copywriting engages your audience, conveys your value proposition clearly, and drives conversions.
        • Design & Video — Creating visual and multimedia content to complement written content.

          High-quality design and video enhance your content’s appeal, making it more engaging and shareable.
        • Review — Evaluating content for accuracy, quality, and alignment with strategy before publication.

          Thorough review ensures your content is polished, professional, and error-free, maintaining your brand’s reputation.
        • Feedback — Gathering input from team members or stakeholders on content drafts.

          Constructive feedback helps refine and improve content, ensuring it meets expectations and goals.
        • Optimization — Adjusting content to improve its performance and effectiveness.

          Ongoing optimization ensures your content stays relevant, performs well in search engines, and meets your audience’s evolving needs.

        Now that you’ve established the layers of your content strategy, it’s time to delve into actionable tools and techniques. This cheatsheet will help you streamline the content creation process and consistently produce engaging material.

        Content Creation Cheatsheet

        • Find Content Ideas
          • Reddit
          • Youtube
          • WhatToTweet
          • Quora
          • Taplio
          • Kleo
          • AlsoAsked
          • FaqFox
          • ViralFindr
          • Others Comments
          • Justin Welsh Content Matrix
        • Formats
          • Carousels
            • Step-by-step tutorials
            • Personal stories
            • Case studies
            • Listicles
            • Collaborative Post
          • Text + Image
            • Twitter screenshot types posts
            • Quotes
            • Personal stories with relevant photo
            • Specific milestone
          • Infographics
            • Infographics
            • Cheatsheet
            • Toolkits
          • Video Content
            • Short tutorials
            • Case studies
            • Answer questions
        • Sizes
          • Carousels: 1080 x 1350 px
          • Videos: 1080 x 1920 px
          • Images:
        • Strategy
          • Carousels:
          • Videos: Nurture
        • Tools
          • Writing: Hemmingway, Grammarly, Taplio
          • Image: Canva, Figma, Photoshop
          • Video: DaVinci Resolve, Adobe Premiere Pro

        With above things in place, it’s essential to turn them into a practical routine. A clear content creation schedule will help you stay consistent and productive, ensuring your brand stays active and visible.

        Weekly Content Creation Schedule

        DAYACTION / TASKTOOLTIME REQ. (APPROX)
        MONDAYFind ideasChatGPT, Gemini, Claude30 mins
        TUESDAYWrite contentGrammarly, Hemingway1 hr
        WEDNESDAYWrite contentGrammarly, Hemingway1 hr
        THURSDAYPlan and create visualsPhotoshop, Canva, Figma, Microsoft Designer1 hr
        FRIDAYCreate visualsPhotoshop, Canva, Figma, Microsoft Designer1 hr
        SATURDAYFinish visualsPhotoshop, Canva, Figma, Microsoft Designer2 hr
        SUNDAYScheduleLinkedIn30 mins

        Creating a content strategy is more than a task—it’s an ongoing commitment to delivering value, building trust, and showcasing your unique voice. By reflecting on your journey, leveraging proven frameworks, and maintaining a disciplined routine, you’re not just creating content—you’re shaping a legacy.

        Your audience is waiting to be inspired. Start building your strategy today, and let your content be the bridge that connects your personal brand to the world.

      4. A Guide to Create Your LinkedIn Featured Section

        In the 19th century, the Great Exhibition of 1851 in London showcased the finest innovations from around the world. More than six million visitors flocked to see groundbreaking inventions displayed in a way that captivated and inspired them. The exhibition wasn’t just a collection of creations—it was a carefully curated showcase of excellence, designed to highlight the best of human achievement.

        Your LinkedIn Featured Section is your personal exhibition. It’s where you can display your finest work, services, and offers in a way that leaves a lasting impression on potential clients, collaborators, and employers.

        Let’s explore how to make your Featured Section a standout showcase.

        Key Elements of a Great Featured Section

        1. Showcase Your Services
          • Add a section featuring the services you provide, making it clear how you can help your audience.
          • Example: “Personal Branding Strategy: Helping clients build a standout online presence.”
        2. Offer a Free Trial or 1:1 Consultation
          • Include a direct link to book a free consultation or trial of your services.
          • Example: “Book a free 30-minute consultation to see how we can elevate your brand!”
        3. Provide Value-Driven Content
          • Feature resources that educate, inspire, or solve a problem for your audience.
          • Example: A free checklist, guide, or webinar replay to demonstrate your expertise and build trust.
        4. Highlight Your Best Work
          • Choose content that showcases your unique expertise.
          • Examples: Case studies, articles, podcast interviews, presentations, or awards.
        5. Showcase Social Proof
          • Add testimonials, client reviews, or screenshots of positive feedback.
          • Example: A glowing testimonial from a client who achieved success after working with you.
        6. Keep It Visual
          • Use high-quality images, graphics, or thumbnails that grab attention.
          • Example: Branded graphics with eye-catching headlines for webinars or eBooks.
        7. Keep It Relevant
          • Regularly update your Featured Section to keep it aligned with your latest work, services, and goals.

        Pro Tips:

        • Keep It Simple: Showcase 1-3 key items to avoid overwhelming your audience.
        • Strong Visual Branding: Use consistent colours, fonts, and layouts to create a cohesive look.
        • Include Clear CTAs: Ensure your featured items include action steps, like “Book Now” or “Download Here.”

        Just like the Great Exhibition highlighted the world’s most innovative achievements, your LinkedIn Featured Section should spotlight your best work and services. It’s your opportunity to turn casual profile visitors into engaged connections and clients by showcasing not just what you’ve accomplished but also how you can help them succeed.

      5. A Guide to Write the Perfect About Section (+Template)

        In the 16th century, Queen Elizabeth I became one of the most famous rulers of England. She called herself the “Virgin Queen,” which meant she said she wasn’t married because she wanted to serve her country. This story made her people trust her and feel close to her. Her ability to communicate a compelling narrative made her one of England’s most iconic monarchs.

        Similarly, your LinkedIn About Section is where you craft your narrative. It’s your chance to connect with your audience, showcase your strengths, and inspire trust.

        Why Your LinkedIn About Section Matters

        Your About section is one of the most viewed parts of your LinkedIn profile. It’s where potential clients, employers, and collaborators go to understand who you are and what you can do for them. A strong About section positions you as a problem-solver and entices viewers to take action.

        The Key Components of a Great LinkedIn About Section

        • Bold Statement: Hooks readers.
        • Audience Pain Points: Shows you understand their challenges.
        • Desired Outcomes: Paints a picture of success for your audience.
        • Offer: Highlights your unique value proposition.
        • Call to Action: Tells them what to do next.

        1. Bold Statement (Hook) – This is your first impression. Start with a powerful statement that grabs attention and showcases your expertise.

        Ask Yourself ➝

        • What makes you unique in your field?
        • What is your passion?
        • What problem do you solve for others?

        Example: I’m a personal branding strategist passionate about helping people becoming brands.

        2. Audience Pain Points – Let your profile viewers know you understand their struggles. Briefly describe the challenges they might be facing.

          Ask Yourself ➝

          • What are the common pain points of your target audience?
          • What keeps them up at night?

          Example: Are you struggling to build your personal brand?

          3. Desired Outcomes – Paint a picture of success for your audience. Describe the positive impact you can make on their lives/businesses.

            Ask Yourself ➝

            • What results do you achieve for your clients?
            • How does your work transform their situation?

            Example: Imagine generating qualified leads, boosting brand awareness, and achieving exponential growth in sales.

            4. Your Offer – This is your value proposition. Highlight the specific skills and solutions you offer.

              Ask Yourself ➝

              • What unique skills and experience do you bring to the table?
              • What specific services do you offer?

              Example: I leverage my experimental personal branding strategies to help your brand standout among the crowd.

              5. Call to Action – Tell your profile viewers what to do next. Make it clear how they can connect or learn more.

                Ask Yourself ➝ What action do you want your profile viewers to take? Do you want them to connect with you, visit your website, or learn more about a specific service?

                Example: Let’s connect and discuss how I can help your business thrive!

                Follow this Template

                Hi,

                I’m [Your Name], [Your Professional Identity], dedicated to [What Makes You Unique].

                Are you a [Target Audience] who has been desperately trying to [Audience Pain Point]?

                My mission is to help [Target Audience] overcome obstacles and achieve [Desired Outcome 1], [Desired Outcome 2], and [Desired Outcome 3].

                With [Number] years of experience in [Your Field], I bring expertise in [Your Key Skills], proven to [Solution 1], [Solution 2], and [Solution 3].

                Let’s connect to explore how we can work and drive success together. Feel free to reach out via [Preferred Contact Method].

                Pro Tips:

                • Be Authentic: Use a conversational tone that reflects your personality.
                • Focus on Your Audience: Keep the spotlight on how you can help them.
                • Keep It Concise: Avoid long paragraphs; use bullet points or short sentences for clarity.

                Your About Section is your story—a window into your values, expertise, and the unique solutions you offer. By crafting it thoughtfully and authentically, you can create connections that open doors to new opportunities.

              1. A Guide to Write the Perfect LinkedIn Headline

                In 1964, Muhammad Ali, then known as Cassius Clay, declared himself “The Greatest” before his historic boxing match against Sonny Liston. This bold statement wasn’t just self-promotion—it became his personal tagline, reinforcing his confidence and unmatched skill. His words captivated the world and cemented his identity as a champion long before he set foot in the ring.

                Just like Ali’s famous declaration, your LinkedIn headline is your chance to make a bold statement about who you are and what you offer. It’s not just a job title—it’s your personal branding statement that sets you apart and piques curiosity.

                Let’s break down how to create a headline that grabs attention and drives engagement.

                Why Your LinkedIn Headline Matters

                Your headline appears in LinkedIn search results, comments, and connection requests. A strong headline increases profile views and builds instant credibility, making it a powerful tool for growing your network and showcasing your expertise.

                5 Steps to Craft Your LinkedIn Headline

                1. Identify Your Unique Selling Proposition (USP)
                  • Define the key value you bring that sets you apart.
                2. Include Your Core Skills and Audience
                  • Highlight your expertise and specify your target audience.
                3. Include Social Proof
                  • Add any awards, recognitions, or key results to build credibility.
                4. Make It Conversational or Action-Oriented
                  • Use action verbs and first-person language to make your headline more engaging.
                5. Keep It Concise
                  • Stay within LinkedIn’s character limit while ensuring your headline is impactful.

                Key Elements of a Catchy LinkedIn Headline

                1. What You Do (X)
                  • Clearly state what you offer.
                  • Example: “I Design Carousels & LinkedIn Banners to Help You Stand Out.”
                2. Benefit
                  • Highlight the outcome your audience can expect from working with you.
                  • Example: “Helping Entrepreneurs Grow and Monetize a 1-Person Business.”
                3. Job Title
                  • Your job title builds professional credibility.
                  • Example: “Marketing Lead @ Apple | Personal Branding Coach.”
                4. Expertise
                  • Showcase your unique skills and strengths.
                  • Example: “Author | Productivity Coach”
                5. Mechanism (How You Deliver Results)
                  • Share the method or service you use to create results.
                  • Example: “Ghostwriting for Founders | Social Media Content Strategy.”
                6. Specific Audience
                  • Specify who you help.
                  • Example: “Copywriter for Founders and Coaches.”
                7. Relevant Question
                  • Start with a question that resonates with your ideal client’s pain points.
                  • Example: “Are You Struggling to Get Leads from LinkedIn? Let Me Help!”
                8. Credibility and Social Proof
                  • Add noteworthy achievements or recognitions to build trust.
                  • Example: “Executive Branding for 7-Figure B2B Businesses | Top 100 Creator.”

                (Tip: You don’t have to include all these things. Just add 2/3 important elements, staying within the character limit.)

                Sample LinkedIn Headlines

                • Helping Entrepreneurs Build 6-Figure Brands Through Personal Branding Strategies | 3x Award-Winning Branding Coach
                • Ghostwriter for Founders and Coaches | I Turn Your Ideas into Engaging LinkedIn Content That Generates Leads
                • Marketing Manager @ Nike | Speaker on Digital Growth | Helping Brands Drive 40% Engagement with Innovative Strategies
                • Executive Branding Expert for B2B Businesses | Featured in Forbes | Building Authority and Boosting Visibility for 6-Figure Clients
                • Social Media Strategist | Helping Creators Monetize Their Content | Driving 50M+ Impressions for Clients | Let’s Build Your Brand
                • Career Coach for Tech Professionals | Author of “Thriving in the Job Market” | Helping You Land Your Dream Job in 90 Days
                • Leadership Consultant for Startups | Transforming Managers into Visionary Leaders | 100+ Success Stories | Follow for Daily Posts
                • Helping Coaches and Consultants Generate Quality Leads | Ghostwriter with Proven Results | 50+ Case Studies of Success
                • Personal Branding Specialist | Favikon Top 50 LinkedIn Creators | Helping Entrepreneurs Build Impactful Digital Identities
                • I Design LinkedIn Banners and Carousels to Help You Stand Out | 70+ Happy Clients | Book Your Free Strategy Call
                • Public Speaking Coach | I Help You Conquer Stage Fright and Deliver Captivating Presentations
                • Helping Small Business Owners Build Stronger Customer Relationships with CRM Strategies
                • Sales Funnel Architect | Helping Solopreneurs Double Their Revenue | Increase Conversion by 35%
                • Mental Health Advocate | Speaker | Sharing Tools to Manage Anxiety and Build Resilience | 10K+ Downloads of My Free Resource Kit
                • Email Marketing Strategist | Driving Open Rates Up by 40% | Helping Founders Communicate Better and Convert More

                Pro Tips:

                • Focus on Your Audience’s Needs: Frame your headline around what your audience values.
                • Avoid Jargon: Use simple, clear language that resonates.
                • Test and Refine: Experiment with different formats to see what attracts the most engagement.

                Just like Muhammad Ali’s declaration of being “The Greatest” made an unforgettable impact, your LinkedIn headline can set the tone for your personal brand.

              2. The Ultimate Guide to Create a Perfect LinkedIn Banner

                In the late 19th century, Coca-Cola revolutionized marketing with its unmistakable logo and visual identity. Its consistency in branding turned a simple beverage into a globally recognized symbol of refreshment. This demonstrates the enduring power of visuals in shaping perceptions and building trust.

                Today, your LinkedIn banner serves a similar purpose. It’s the digital billboard of your professional brand—your chance to make a strong first impression. Let’s explore how to craft a banner that communicates your value and engages your audience.

                A great banner has these key elements:

                1. Clear Offer
                  • Communicate your value or services in a direct, impactful message.
                  • Example: “Helping Startups Scale Faster with Growth Strategies.”
                2. Good Branding
                  • Use colours and fonts that reflect your personality and brand identity. Stick to consistent branding to make your profile instantly recognizable.
                3. Great Headshot
                  • Include a high-quality, professional photo of yourself. This adds a personal touch and builds trust.
                4. Eye-Catching Visuals
                  • Use high-quality images or graphics that align with your brand’s vibe and make your banner visually appealing.
                5. Balanced Layout
                  • Ensure alignment, appropriate white space, and minimal clutter to maintain a clean and polished look.
                6. Call-to-Action (CTA)
                  • Guide your audience with clear next steps. Examples include:
                    • “Follow for More Tips.”
                    • “Book a Free Consultation.”
                    • “Download My Free eBook.”
                7. Logo
                  • If applicable, add your logo for instant brand recognition.

                Ask yourself these two questions.

                • Ask yourself: What is the biggest challenge your Ideal Customer Profile (ICP) face?
                • How can you help them in a better way than others?

                Start with a Canvas

                Go to Canva.com or your preferred design tool. Search for “LinkedIn Background Photo” or create a custom size of 1584 x 396 px.

                Position Your Solution

                Use the banner to showcase how you can solve their problem.
                For instance: Build Your Personal Brand in 30 Days.

                Incorporate the Key Elements

                Ensure your banner includes the above key components: clear offer, branding, headshot, visuals, layout, CTA, and logo.

                Incorporate Visual Elements

                • Add a gradient overlay or other design elements to make the text pop.
                • Include directional elements like curved lines to guide the viewer’s eye.

                Finalize Your Banner

                Double-check for typos, ensure alignment, and preview how the banner looks on mobile and desktop screens.

                Pro Tips:

                • Keep It Simple: Avoid overloading your banner with too many elements.
                • Focus on Readability: Use large, clean fonts that are easy to read at a glance.
                • Test Different Variations: Experiment with layouts and designs to see what resonates most with your audience.

                Your LinkedIn banner can enhance your professional brand’s presence. It’s your chance to communicate your expertise, value, and personality in one glance.

                Take the time to craft a banner that reflects your personal brand.